Creating a static website using GoDaddy, AWS S3, and AWS CloudFront
So you want to make a website? And it is static HTML, CSS, JS (or mostly anyway) and you want options on hosting that is cost effective, can scale just in case your site goes viral, and is fairly easy to maintain? Well you are in luck if you have an Amazon Web Services (AWS) account! You can easily make an HTTPS:// website to satisfy all of these requirements fairly easily. This is my journey in that.
If you do not yet have a domain name, I would point you to AWS Route 53 to register a domain name. I chose to use GoDaddy for my website domain name as my account there has been active more than a decade. And I am using the Google Suite for my email and corporate documents and such. So I had a domain, I just needed a website. This is where all this information kicks in! Realize some things you need to set in motion and wait for AWS to propagate out and set in motion. This may take a day off and on to setup 100%.

Step 1: setup your S3 bucket
This is a fairly simple one. Log into your AWS account. Setup a new S3 bucket in the S3 console. You do not have to make this publicly available or set it up as a website with extra properties — just a regular S3 bucket. You do all the other things to make this a website with CloudFront and add a user later on to access your bucket. Just setup the S3 bucket and drop in your files. I turned versioning on so I knew when things changed and could go back in time if needed (regardless of me storing the files in GitHub). Now copy in your files (or file) and make sure they are all there. Realize CloudFront will cache files with a time to live (TTL) setting so double check your files, spelling, responsive mobile view, etc. and get it good enough before you go on to Step 2.
Step 2: Setup CloudFront
Ok now that you are in AWS and have an S3 bucket, go to the CloudFront service and click the Create Distribution button. A distribution is what you have setup under CloudFront to have it “front” S3 for your website. You are presented a few options here however just click the Get Started button under Web. Now you have this long ass form with a bunch of things that may look a little overwhelming. It is not too bad once we go through it below and you start to understand it. Click the little (i) info icons to the right of each field to get a great explanation of what goes in them. I included some major ones below.
Origin Domain Name is the name of your S3 bucket. Origin Path is if you have a path/folder in there that is your “root” web folder. I only had the S3 folder as my website so I had no origin path — everything was in the root of the folder. For Origin ID make a name that means something please and you will understand when you start having more things listed under CloudFront! This is used for you to know what it is. Use “redirect HTTP to HTTPS” for viewer policy. Allowed options would be GET, HEAD. You want to restrict bucket access (YES) and create a new identity (eventually) that CloudFront will use for access to your S3 bucket for this effort. (Note: after you make this CloudFront distribution you set the user to connect to S3 as. I did not see it in the initial setup I believe. Just be sure to set it!) You can setup the cache information if you wish or keep the default settings. Default time to live (TTL) is a day in # of seconds.
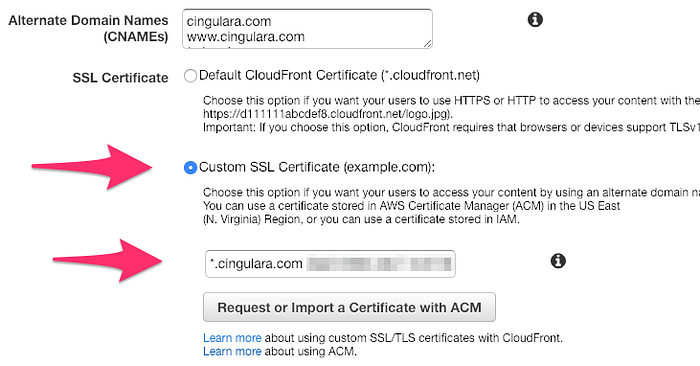
For the distribution settings you choose the option that makes sense to you. Right now I have US, Canada, and Europe however I surely hope this grows and I need to front the whole world! For alternate domain names you MUST put in all names you will use. I put cingulara.com, www.cingulara.com, and *.cingulara.com just to be safe for now. This may change for me but it works as of today. The “*” means anythinghere.cingulara.com. For the SSL Certificate you want to choose the “Custom SSL Certificate” and request a brand new certificate from ACM. That will open a new window and will walk you through adding some CNAME records (described below) to verify YOU own the domain. Then AWS makes the certificate in time and you can select it for this distribution. My SSL certification creation and verification of domain took about 12 hours to make. Just watch out for it on your AWS account. Keep the default TLS as well as the HTTP/2, 1.1, and 1.0 options.

Make sure you enter your default root object (i.e. index.html). I forgot to do this and the / root URL (not putting in a file name) was failing. Lastly any comments that you will need for later or to remind you what this is for and click the Create Distribution button! Now let it build for you.
Step 3: Drop in DNS CNAME records to verify CloudFront
The Amazon Certificate Manager mentioned above is where you request your HTTPS/SSL certificate. Click the Request a certificate button and specify to request a public certificate. For your SSL certificate domain name use *.yourdomain.com or whatever it is. I used the wildcard * so I could have other subdomains at a third level here in the future. If not you are locked in to just the main domain you specify here. You can always generate a new one later if you need to as well, this is not set in concrete never to be changed. I am just telling you what I did and why I did it. You can choose DNS validation or Email to validate that you own the domain you are requesting the SSL certificate for as well. I did DNS validation (I have a domain proxy in front of my domain names usually) and it gave me a few items to put as CNAME records in my GoDaddy DNS Manager. Realize it will give you some odd name like “_aafkasdflkhfuoihaweofiuyewioprrajfhsadkjfhd.cingulara.com” and the value. The value is 100% right use it as is in your CNAME entry. For the Name you enter (like mine above), drop off the .yourdomain.com part of it when you make the CNAME entry. So it is just the initial part before the first “.” period. AGAIN I had to find this out myself and am just saving you some time, headache, and screaming at your computer. If you do not know how to get to the DNS Manager in GoDaddy please check their site out. They have great information and help in managing your domains.
Step 4: Setup an SSL certificate through AWS Certificate Manager (ACM)
Once the SSL certificate is validated (takes up to 3 days but mine was about 1 day) ACM will issue it. You can then go back to CloudFront and select that certificate by editing the main General tab for settings and clicking in the dropdown listing for the certificate. Click on the correct one to select it. Then you are setup for HTTPS to your new site, redirecting HTTP to HTTPS, all with a valid wildcard certificate! You could request an SSL certificate outside of AWS as well and import the new certificate. I just did it here to make it easier.
Step 5: Let CloudFront publish and finish your Distribution
You need patience here to get the real https://yoursite.com/ answering via Chrome/Safari/Firefox/some-nasty-Microsoft-browser. You can always hit your URL that cloud front gives you when it is done (i.e. https://xxyssdfh3478xdsqa43367ya.cloudfront.net) but that is NOT the website you want to give out to advertise your new space online. The publishing takes a while so watch your AWS console every so often and check email for notification of it. While waiting, go learn some cool Lambda stuff or API Gateway interaction!
Step 6: Setup a CNAME record for www to point to your new *.cloudfront.net URL
When you know your *.cloudfront.net URL from above you need to enter a CNAME record in DNS for www to point to that. Kind of like a proxy in essence. It will look like the below. This is separate from the ACM saying “enter this CNAME so we know you own the domain” and it for anyone going to www.yourdomain.com to have the xxxxxxxxxxxx.cloudfront.net generated URL show your website. Your xxxxxxxxx.cloudfront.net is listed once you save your distribution settings. Get this CNAME in there so the www address behind the scenes points to CloudFront, which in turns points to S3 and serves up your website content.

Step 7: Setup GoDaddy to forward your domain
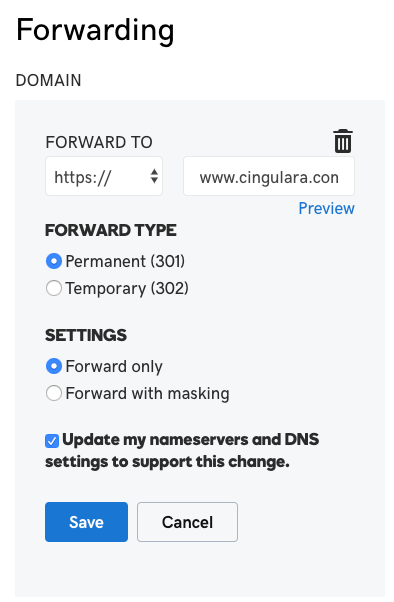
When I had this all setup I could go to https://www.cingulara.com/ and have it come up with my index.html file (once I set the default document in CloudFront) as well as have the SSL certificate be a valid certificate. (It won’t be a valid SSL certificate until publishing is done properly) However, https://cingulara.com/ did not work and I had to hunt around a bit and rattle my brain some to see why. If you go to the GoDaddy DNS Manager page and scroll down near the bottom you see a “Forwarding” section that should be labeled “Not set up”. This is what you need to update. Add this for you to redirect to www.yourdomain.com for you as pictured below when people just request yourdomain.com in their favorite web browser. Again there may be a few ways to do this correctly. I decided to do it this way in the GoDaddy DNS Manager and it worked. And it did not mess up me getting email to my @cingulara.com either.
Step 8: Test it from your computer, tablet, iPad, TV, Kiosk, and phone
So now that your SSL certificate was issued, you applied it to CloudFront, CloudFront is setup to point to your S3 bucket, you added the correct user account for permissions after you set it up (noted far above in this post), and you forwarded your domain to www.yourdomain.com you should be able to see it all correctly! So try it. Go to http://whateverthisis.com and https://whateverthisis.com as well as http://www.whateverthisis.com/ and the like. Make sure it works across all your devices and always ends up at https://. And remember, since you setup caching in CloudFront that if you make a change in your S3 bucket files it MAY NOT be available right away. So either shorten the TTL or just edit the file and wait for cache to die. You can check the dates on the files in S3 to know when the last update was to keep as much of your sanity as you possibly can.
Step 9: Have others test it
So once you know it works for you on all your devices, have your friends, relatives, others around the US or the globe (or Mars) test it to ensure you are truly working 100%. If not troubleshoot it by searching around AWS for settings and matching them to this post, check StackOverflow.com or other medium.com posts that talk on these things. The info is out there! Do some digging and you will probably learn a lot more about this to get comfortable and make it repeatable for you.
Step 10: Link it to your social media accounts, email, business cards, and GSD!
Once all is well with the website you can go add this to your Twitter account, Facebook account, Insta account, and all other accounts as well as in your email footer and business cards. And then go conquer the world! In case you were wondering, GSD = get sh*t done!
Ok so that is enough for most people. For me, where automation is key to being lazy (which is REALLY hard work to do!) I had to do more with this. I wanted version control over files. I wanted automated publishing. I wanted notification in Slack. And I wanted a separate notification if anyone edited a file in S3 straight. So that is where the 2nd step of this will come in with my next post.